
How to Make a Minecraft Mod: Fabric Projects, Java Code, and JAR Building
This guide covers creating a mod that outputs a log on its first run, based on Minecraft Java Edition 26.2 and Fabric. It is an introductory example to follow up to the point where the mod file is recognized by the loader and your written Java code executes. Because the structure differs from Bedrock add-ons and Forge/NeoForge projects, do not mix them in a single project.
1. Preparing the Development Environment
The current 26.2 documentation for Fabric recommends JDK 25. Instead of installing only the Java runtime environment, install the development JDK and prepare IntelliJ IDEA or VS Code. Check the currently used Java in your terminal with the command below. The IDE's Project SDK and Gradle JVM must also point to the same version. To create for older versions such as 1.21.1, change the version selection at the top of the documentation and the generator version together, and follow the JDK requirements of that version.
java -version
javac -version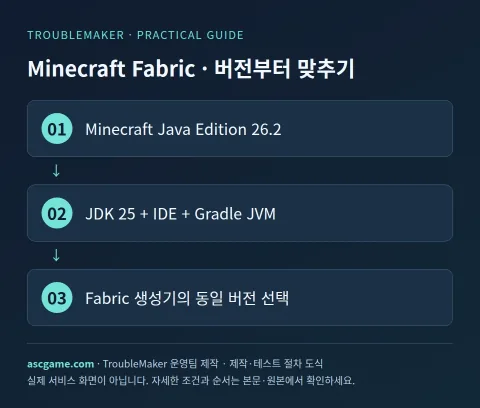
2. Creating a Project in the Fabric Generator
- Open the official Fabric Template Mod Generator.
- Set the Mod Name to TroubleMaker Hello, the Mod ID to tmhello, and the Package Name to com.ascgame.tmhello.
- Match the Minecraft version to 26.2. Advanced options like Kotlin or separate data generation do not need to be added in the first example.
- Download the ZIP and extract it to a simple path like C:/Projects/TMHello. Determine the project folder according to your actual operating system.
- Open build.gradle or the project root in your IDE and wait for Gradle importing to finish. Keep the Loader, Loom, and API versions determined by the generator as they are.
3. Understanding What the Files Do
src/main/java is for common Java code, src/main/resources/fabric.mod.json declares the mod ID, entry class, and dependencies, and gradle.properties handles version and project settings. Depending on the generator, client code may be separated into src/client/java. This example changes only the common initialization code. Do not arbitrarily delete all configuration files or overwrite them with settings for other versions found on the internet.
4. Writing Your Initialization Class
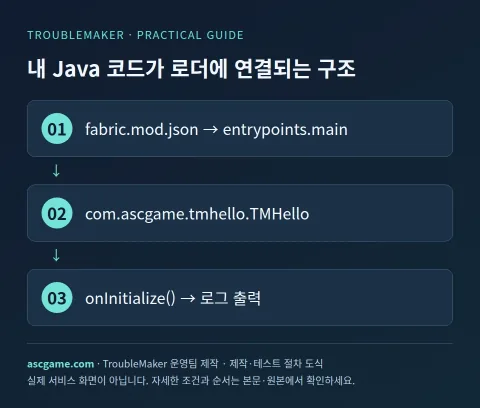
Find the generated common ModInitializer implementation file and modify it to the structure below. If you renamed the file to TMHello.java, make sure the package folder and class name match as well. Since SLF4J logging is used, you can verify initialization without item registration APIs that are prone to changing across different game versions.
package com.ascgame.tmhello;

import net.fabricmc.api.ModInitializer;
import org.slf4j.Logger;
import org.slf4j.LoggerFactory;

public class TMHello implements ModInitializer {
    public static final String MOD_ID = "tmhello";
    private static final Logger LOG = LoggerFactory.getLogger(MOD_ID);

    @Override
    public void onInitialize() {
        LOG.info("TroubleMaker: my first Fabric mod is ready.");
    }
}
While keeping the rest of fabric.mod.json, ensure that entrypoints.main points to the full name of the class above. Below is the part to check, not the entire file. Do not replace existing mixins or client configurations entirely.
{
  "entrypoints": {
    "main": ["com.ascgame.tmhello.TMHello"]
  }
}
5. Development Execution and Final File Building
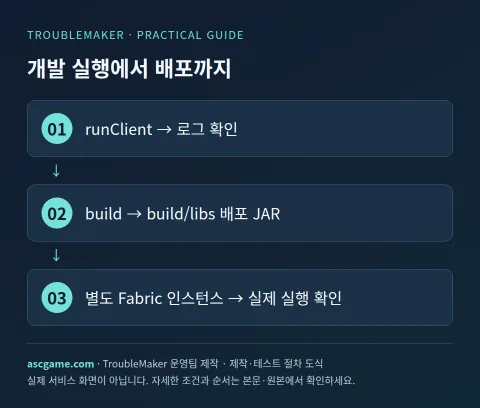
- At the project root, run gradlew.bat runClient on Windows or ./gradlew runClient on macOS/Linux.
- Search for the TroubleMaker phrase in the development client console or run/logs/latest.log. This is an example that outputs once during initialization before entering a world.
- Close the game and create the distribution file using gradlew.bat build on Windows or ./gradlew build on macOS/Linux.
- Check the general distribution JAR in build/libs. Do not use development files with sources or dev appended to their names as general distributions.
- Place the JAR into the mods folder of a separate Fabric instance for the same Minecraft version. If Fabric API is in the generated dependencies, install it matching the same version.
- Run it with the actual launcher and verify that the same phrase is printed in the instance's logs/latest.log.
6. Common Errors and Recovery
For Unsupported class file version, check the Java version first; for entry class loading errors, check mismatches in package, class name, and entrypoints. If it is silent after placing it in the mods folder, check whether you put it in a different launcher instance. Since this example does not add save data, you can exit the game and remove the JAR to compare. When adding items or blocks later, continue reading the Fabric First Item documentation for the target version, and match the file paths and registration APIs to that version.
7. Information to Include When Sharing
Write the mod ID, supported Minecraft versions, Loader and Fabric API conditions, JDK requirements, and example features and removal methods in the README. Separate the source code and the distribution JAR, and do not include the game executable or other creators' mod files. For the initial version, verify that the logs output correctly in the actual general launcher, then distribute it with a version number like 1.0.0.
Original Documents and Verification Criteria
This introductory guide was written by the TroubleMaker operations team, verified against creator and official tool documents on October 7, 2026. The code and diagrams are custom examples for explanation purposes and do not represent the verified results of actual gameplay of the game on this server. Verify and distribute using a separate test save with the version specified in the text. Compare the latest versions and dependencies for each tool using the original sources below.
Gemini machine translation · Original text and source region are preserved.
Original language · ko
마인크래프트 모드 만드는 법: Fabric 프로젝트·Java 코드·JAR 빌드까지
이 공략은 Minecraft Java Edition 26.2와 Fabric을 기준으로 첫 실행 때 로그를 출력하는 모드를 만듭니다. 모드 파일이 로더에 인식되고 내가 쓴 Java 코드가 실행되는 지점까지 따라가는 입문 예제입니다. Bedrock 애드온, Forge·NeoForge 프로젝트와 구조가 다르므로 한 프로젝트 안에 섞지 마세요.
[1. 개발 환경 준비]
Fabric의 현재 26.2 문서는 JDK 25를 안내합니다. Java 실행 환경만 설치하는 대신 개발용 JDK를 설치하고 IntelliJ IDEA 또는 VS Code를 준비합니다. 터미널에서 아래 명령으로 실제 사용 중인 Java를 확인하세요. IDE의 Project SDK와 Gradle JVM도 같은 버전을 가리켜야 합니다. 1.21.1 등 구버전으로 만들려면 문서 상단 버전 선택과 생성기 버전을 함께 바꾸고 그 버전의 JDK 요구 사항을 따릅니다.
```sh
java -version
javac -version
```
[image:conditions]
[2. Fabric 생성기에서 프로젝트 만들기]
1. Fabric 공식 Template Mod Generator를 엽니다.
2. Mod Name은 TroubleMaker Hello, Mod ID는 tmhello, Package Name은 com.ascgame.tmhello로 지정합니다.
3. Minecraft 버전을 26.2로 맞춥니다. Kotlin·별도 데이터 생성 등 고급 옵션은 첫 예제에서 추가하지 않아도 됩니다.
4. ZIP을 내려받아 C:/Projects/TMHello 같은 단순한 경로에 압축을 풉니다. 프로젝트 폴더는 실제 운영체제에 맞춰 정합니다.
5. IDE에서 build.gradle 또는 프로젝트 루트를 열고 Gradle 가져오기가 끝날 때까지 기다립니다. 생성기가 정한 Loader·Loom·API 버전을 그대로 보관합니다.
[3. 파일이 하는 일을 이해하기]
src/main/java는 공통 Java 코드, src/main/resources/fabric.mod.json은 모드 ID·진입 클래스·의존성 선언, gradle.properties는 버전과 프로젝트 설정입니다. 생성기에 따라 클라이언트 코드가 src/client/java로 나뉠 수 있습니다. 이 예제는 공통 초기화 코드만 바꿉니다. 임의로 모든 설정 파일을 지우거나 인터넷의 다른 버전 설정을 덮어쓰지 마세요.
[4. 내 초기화 클래스를 작성하기]
생성된 공통 ModInitializer 구현 파일을 찾고 아래 구조로 수정합니다. 파일명을 TMHello.java로 바꾸었다면 package 폴더와 클래스 이름도 일치시킵니다. SLF4J 로그를 사용하므로 다른 게임 버전에서 바뀌기 쉬운 아이템 등록 API 없이 초기화 여부를 확인할 수 있습니다.
```java
package com.ascgame.tmhello;
import net.fabricmc.api.ModInitializer;
import org.slf4j.Logger;
import org.slf4j.LoggerFactory;
public class TMHello implements ModInitializer {
public static final String MOD_ID = "tmhello";
private static final Logger LOG = LoggerFactory.getLogger(MOD_ID);
@Override
public void onInitialize() {
LOG.info("TroubleMaker: my first Fabric mod is ready.");
}
}
```
fabric.mod.json의 다른 내용을 유지한 채 entrypoints.main이 위 클래스의 전체 이름을 가리키는지 확인합니다. 아래는 전체 파일이 아니라 확인할 부분입니다. 기존 mixins나 client 설정까지 통째로 대체하지 마세요.
```json
{
"entrypoints": {
"main": ["com.ascgame.tmhello.TMHello"]
}
}
```
[image:request]
[5. 개발 실행과 최종 파일 빌드]
1. 프로젝트 루트에서 Windows는 gradlew.bat runClient, macOS/Linux는 ./gradlew runClient를 실행합니다.
2. 개발 클라이언트 콘솔 또는 run/logs/latest.log에서 TroubleMaker 문구를 검색합니다. 월드에 들어가기 전 초기화 때 한 번 출력되는 예제입니다.
3. 게임을 종료하고 Windows는 gradlew.bat build, macOS/Linux는 ./gradlew build로 배포 파일을 만듭니다.
4. build/libs에서 일반 배포 JAR을 확인합니다. 이름에 sources 또는 dev가 붙은 개발용 파일을 일반 배포본으로 사용하지 않습니다.
5. 같은 Minecraft 버전의 별도 Fabric 인스턴스 mods 폴더에 JAR을 넣습니다. 생성된 의존성에 Fabric API가 있으면 같은 버전에 맞춰 설치합니다.
6. 실제 런처로 실행하고 인스턴스의 logs/latest.log에 같은 문구가 찍히는지 확인합니다.
[6. 자주 생기는 오류와 복구]
Unsupported class file version은 Java 버전, 진입 클래스 로딩 오류는 package·클래스명·entrypoints 불일치부터 확인합니다. mods 폴더에 넣었는데 조용하면 다른 런처 인스턴스에 넣었는지도 확인하세요. 이 예제는 세이브 데이터를 추가하지 않으므로 게임을 종료하고 JAR을 제거해 비교할 수 있습니다. 이후 아이템이나 블록을 추가할 때는 대상 버전의 Fabric First Item 문서를 이어서 읽고, 파일 경로와 등록 API를 그 버전에 맞춥니다.
[image:contact]
[7. 공유할 때 함께 적을 정보]
모드 ID, 지원 Minecraft 버전, Loader·Fabric API 조건, JDK 요구 사항, 예제 기능과 제거 방법을 README에 적습니다. 코드 원본과 배포 JAR을 구분하고 게임 본체나 다른 제작자의 모드 파일을 포함하지 않습니다. 최초 버전은 로그가 실제 일반 런처에서 출력되는지 확인한 뒤 1.0.0처럼 버전을 붙여 배포하세요.
[원본 문서와 확인 기준]
2026년 10월 7일 제작자·공식 도구 문서를 확인해 TroubleMaker 운영팀이 작성한 입문 공략입니다. 코드와 도식은 설명을 위한 자체 예제이며 이 서버에서 해당 게임의 실제 플레이를 검증한 결과는 아닙니다. 본문에 명시한 버전으로 별도 테스트 세이브에서 확인하고 배포하세요. 도구별 최신 버전·의존성은 아래 원본에서 대조합니다.
Fabric 개발 환경
Fabric 프로젝트 생성
Fabric 모드 빌드
Fabric 공식 생성기
comments 1
제시해주신 가이드에서 언급된 JDK 25와 같은 특정 Java 버전 요구 사항이, 프로젝트 생성 시 선택하는 마인크래프트 버전마다 다르게 적용되는 것인가요? 아니면 Fabric 로더 자체의 업데이트 주기에 따라 결정되는 것인지 궁금합니다.