
How to Create Mods in Baldur's Gate 3: Customizing, Testing, and Publishing with the Official Toolkit
This guide covers making a practice melee fire spell using the Stats Editor and UUID Object Editor in the official Baldur’s Gate 3 Toolkit. You will learn data handling, localization, and spell list integration without needing 3D models. Distinguish between the Windows PC authoring environment and the in-game mod usage environment, and work in accordance with game builds that support the official mod manager.
1. Installing the Toolkit and Empty Project
Check Larian's Installing the Toolkit documentation for the installation order of the Toolkit and Toolkit Data for your store platform. For Steam, this involves checking the tools section in your library and the Toolkit Data game DLC. Record your existing game/toolkit version and saves, and create a new project following the Creating a New Mod documentation. Choose a unique name like TroubleMakerPracticeSpell and keep the default dependency settings as outlined in the official docs. Loading the entire game data may take some time during your initial work.
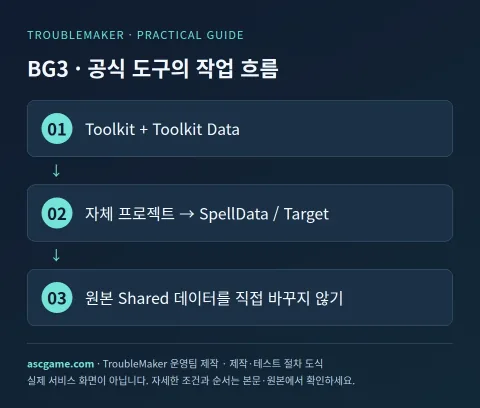
2. Creating Target Spell Data in the Stats Editor
- Open the Stats Editor at the top of the editor.
- Expand your own project rather than the Shared original.
- Select + in SpellData and add Target data.
- Create a row in the new Target table and assign the Name TMPracticeFlame. This is an internal name without spaces.
- The technical identifier name will be Target_TMPracticeFlame. Do not confuse this display name with this internal ID.
- Refer to the required columns in the official Basic Spell documentation to fill in the values and animation items below.
3. Filling Required Values for a Small Spell
Below is a bundle of practice values. Rather than pasting this block into a file, find each corresponding column in the Stats Editor and enter them individually. Configure it simply as Level 1, 1.5m melee, Dexterity saving throw, and 1d6 fire damage. Test a single effect before adding area-of-effect or healing all at once.
Name: TMPracticeFlame
Level: 1
SpellSchool: Evocation
TargetRadius: 1.5
SpellRoll: not SavingThrow(Ability.Dexterity, SourceSpellDC())
SpellSuccess: DealDamage(1d6,Fire,Magical)
SpellFail: DealDamage(1d6/2,Fire,Magical)
TargetConditions: Character() and not Dead()
CastTextEvent: Cast
UseCosts: ActionPoint:1;SpellSlotsGroup:1:1:1
Icon: Spell_Evocation_Fireball
The official documentation explains that spells require a Spell Animation to actually cast. Find an original Touch-type spell in Shared → SpellData → Target, copy its Spell Animation value, and paste it into your row. Row numbers vary depending on the game data version, so use search to find them. Select the required PrepareEffect, CastEffect, and HitEffect using the corresponding suffix items listed in the official documentation. For SpellFlags, check IsSpell, IsHarmful, IsMelee, and the appropriate casting conditions.
4. Player-Facing Names and Descriptions
In DisplayName, enter a custom name such as Practice Fire Touch, and in Description, enter a description like Deals [1] to the target. Localization input windows and string handles are managed using the Adding Localisation documentation method. Use DealDamage(1d6,Fire) for DescriptionParams and TooltipDamageList, and Dexterity for TooltipAttackSave to ensure actual numbers match the tooltips. Translating internal IDs can break spell list connections, so only translate display strings.
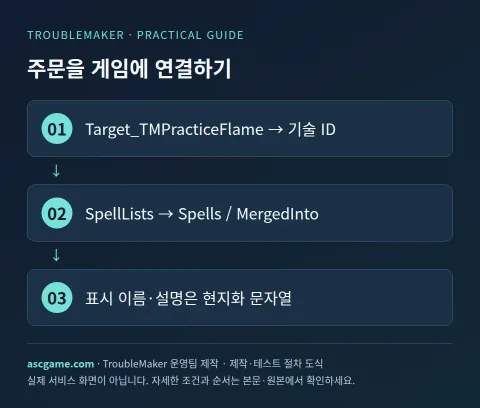
5. Adding to Spell Lists and Verifying in Game Mode
- Create your project's Lists → SpellLists table in the UUID Object Editor.
- Write a developer-friendly description in the Name field of the new entry.
- Add Target_TMPracticeFlame to Spells. This value requires the spell type prefix.
- Select the existing class spell list for that level in MergedInto. Since this example is Level 1, select the appropriate list such as Cleric SLevel 1.
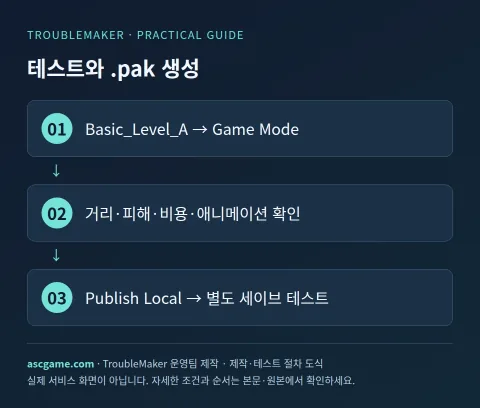
- Save all changes and load the Basic_Level_A test level.
- Enter Game Mode and select the class and spell during character creation or level up. You can use the Ctrl+Shift+L level-up feature over portraits mentioned in official guides.
- Check the target distance, damage on save success/failure, spell slot/action costs, and name, description, and animation respectively.
6. Local .pak and Public Distribution
Fill in the name, description, and thumbnail in Project → Project Settings. Publish Local is a feature that creates a .pak without public uploading, allowing you to choose the generation location. Enable the local pack using the official mod manager in a separate game profile and re-verify in a new test save. Public distribution on mod.io additionally requires Larian and mod.io account linking and authentication, file scanning, and description, tag, and dependency settings. Also note the original instruction that editor dependencies and mod.io dependencies must be set separately.
7. Troubleshooting Missing Spells and Removal
If the spell is not visible, check the Target_ prefix in the internal name, MergedInto in SpellLists, and the spell level and class level in order. If it fails to cast, check Spell Animation, CastTextEvent, and UseCosts. If tooltip values differ, compare DescriptionParams with the actual SpellSuccess. Removing a mod from a save may affect loading and behavior, so use a copy rather than your original save for comparison. In your distribution description, note supported builds, tested classes, required dependencies, and multiplayer conditions, and check official platform-specific reviews for console availability.
Original Documents and Verification Criteria
This introductory guide was written by the TroubleMaker operations team based on creator and official tool documentation verified on October 7, 2026. Code and diagrams are custom examples for explanatory purposes and do not represent actual gameplay verification of the game on this server. Verify and distribute using a separate test save with the versions specified in the text. Cross-reference the latest versions and dependencies for each tool from the originals below.
Gemini machine translation · Original text and source region are preserved.
Original language · ko
발더스 게이트 3 모드 만드는 법: 공식 Toolkit으로 주문 제작·테스트·배포
공식 Baldur’s Gate 3 Toolkit의 Stats Editor와 UUID Object Editor로 연습용 근접 화염 주문을 만드는 공략입니다. 3D 모델 제작 없이 데이터·현지화·주문 목록 연결을 익힙니다. Windows PC 제작 환경과 게임 내 모드 이용 환경을 구분하고, 공식 모드 관리자 지원 게임 빌드와 맞춰 작업합니다.
[1. Toolkit 설치와 빈 프로젝트]
Larian의 Installing the Toolkit 문서에서 보유 스토어의 Toolkit과 Toolkit Data 설치 순서를 확인합니다. Steam은 라이브러리의 도구 표시와 게임 DLC의 Toolkit Data를 확인하는 흐름입니다. 기존 게임·툴킷 버전과 세이브를 기록하고, Creating a New Mod 문서에 따라 새 프로젝트를 만듭니다. 이름은 TroubleMakerPracticeSpell처럼 고유하게 정하고 기본 의존성 설정은 공식 문서대로 유지합니다. 처음 작업할 때는 게임 전체 데이터의 로딩에 시간이 걸릴 수 있습니다.
[image:conditions]
[2. Stats Editor에서 Target 주문 데이터 만들기]
1. 에디터 상단의 Stats Editor를 엽니다.
2. Shared 원본이 아니라 자신의 프로젝트를 확장합니다.
3. SpellData에서 +를 선택하고 Target 데이터를 추가합니다.
4. 새 Target 표에 행을 만들고 Name을 TMPracticeFlame으로 지정합니다. 공백 없는 내부 이름입니다.
5. 기술 식별 이름은 Target_TMPracticeFlame이 됩니다. 표시 이름과 이 내부 ID를 혼동하지 마세요.
6. 공식 Basic Spell 문서의 필수 열을 함께 펼쳐 아래 값과 애니메이션 항목을 채웁니다.
[3. 작은 주문의 필수 값을 채우기]
아래는 연습용 값의 묶음입니다. 이 블록을 파일에 붙여넣는 방식이 아니라 Stats Editor에서 해당 열을 찾아 각각 입력합니다. Level 1, 근접 1.5m, 민첩 내성 굴림, 화염 1d6으로 단순하게 구성합니다. 반경 공격·치유를 한꺼번에 추가하기 전에 한 가지 효과부터 테스트합니다.
```text
Name: TMPracticeFlame
Level: 1
SpellSchool: Evocation
TargetRadius: 1.5
SpellRoll: not SavingThrow(Ability.Dexterity, SourceSpellDC())
SpellSuccess: DealDamage(1d6,Fire,Magical)
SpellFail: DealDamage(1d6/2,Fire,Magical)
TargetConditions: Character() and not Dead()
CastTextEvent: Cast
UseCosts: ActionPoint:1;SpellSlotsGroup:1:1:1
Icon: Spell_Evocation_Fireball
```
공식 문서는 주문이 실제 시전되려면 Spell Animation이 필요하다고 설명합니다. Shared → SpellData → Target에서 Touch 유형의 원본 주문을 찾아 Spell Animation 값을 복사해 자신의 행에 넣습니다. 행 번호는 게임 데이터 버전에 따라 바뀌므로 검색으로 찾으세요. 필요한 PrepareEffect·CastEffect·HitEffect는 공식 문서에 나온 대응 접미사 항목으로 선택합니다. SpellFlag에는 IsSpell·IsHarmful·IsMelee와 적절한 시전 조건을 확인합니다.
[4. 플레이어가 읽는 이름·설명]
DisplayName에는 연습용 화염 접촉이라는 자체 이름을, Description에는 대상에게 [1]을 가합니다라는 설명을 입력합니다. 현지화 입력 창과 문자열 handle은 Adding Localisation 문서 방식으로 관리합니다. DescriptionParams와 TooltipDamageList에는 DealDamage(1d6,Fire), TooltipAttackSave에는 Dexterity를 사용해 실제 수치와 툴팁이 어긋나지 않게 확인합니다. 내부 ID를 번역하면 주문 목록 연결이 끊길 수 있으므로 표시 문자열만 번역합니다.
[image:request]
[5. 주문 목록에 넣고 게임 모드에서 확인]
1. UUID Object Editor에서 자신의 프로젝트 Lists → SpellLists 표를 만듭니다.
2. 새 항목의 Name에 개발자가 알아볼 설명을 적습니다.
3. Spells에 Target_TMPracticeFlame을 넣습니다. 이 값에는 주문 유형 접두사가 필요합니다.
4. MergedInto에서 해당 레벨의 기존 클래스 주문 목록을 선택합니다. 이 예제는 Level 1이므로 Cleric SLevel 1처럼 맞는 목록을 선택합니다.
5. 모든 변경을 저장하고 Basic_Level_A 테스트 레벨을 로드합니다.
6. Game Mode로 들어가 캐릭터 생성·레벨업에서 해당 클래스와 주문을 선택합니다. 공식 안내의 초상화 위 Ctrl+Shift+L 레벨업 기능을 활용할 수 있습니다.
7. 대상 거리, 내성 성공·실패의 피해, 주문 슬롯·행동 비용, 이름·설명·애니메이션을 각각 확인합니다.
[6. 로컬 .pak과 공개 배포]
Project → Project Settings에서 이름·설명·썸네일을 작성합니다. Publish Local은 공개 업로드 없이 .pak을 만드는 기능이며 생성 위치를 선택할 수 있습니다. 별도 게임 프로필에서 공식 모드 관리자로 로컬 팩을 활성화하고 새 테스트 세이브에서 다시 확인합니다. mod.io 공개 배포는 Larian·mod.io 계정 연결과 인증, 파일 스캔, 설명·태그·의존성 설정이 추가로 필요합니다. 에디터 의존성과 mod.io 의존성은 각각 설정해야 한다는 원본 안내도 확인하세요.
[image:contact]
[7. 주문이 안 보일 때와 제거]
주문이 안 보이면 내부 이름의 Target_ 접두사, SpellLists의 MergedInto, 주문 레벨과 클래스 레벨을 순서대로 확인합니다. 시전되지 않으면 Spell Animation과 CastTextEvent, UseCosts를 확인합니다. 툴팁 수치가 다르면 DescriptionParams와 실제 SpellSuccess를 비교합니다. 모드를 사용한 세이브에서 제거하면 로딩·동작에 영향을 줄 수 있으므로 원본 세이브가 아닌 복사본으로 비교합니다. 배포 설명에는 지원 빌드·테스트한 클래스·필요 의존성·멀티플레이 조건을 적고, 콘솔 이용 가능 여부는 플랫폼별 공식 검토 결과를 확인합니다.
[원본 문서와 확인 기준]
2026년 10월 7일 제작자·공식 도구 문서를 확인해 TroubleMaker 운영팀이 작성한 입문 공략입니다. 코드와 도식은 설명을 위한 자체 예제이며 이 서버에서 해당 게임의 실제 플레이를 검증한 결과는 아닙니다. 본문에 명시한 버전으로 별도 테스트 세이브에서 확인하고 배포하세요. 도구별 최신 버전·의존성은 아래 원본에서 대조합니다.
https://docs.baldursgate3.game/index.php?title=Getting_Started:_Installing_the_Toolkit
https://docs.baldursgate3.game/index.php?title=Getting_Started:_Creating_a_New_Mod
https://docs.baldursgate3.game/index.php?title=Making_a_Basic_Spell
https://docs.baldursgate3.game/index.php?title=Adding_Localisation
https://docs.baldursgate3.game/index.php?title=Getting_Started:_Publishing_a_Mod
comments 1
Stats Editor에서 Spell Animation 값을 복사할 때, 원본 주문의 행 번호가 게임 업데이트에 따라 변경될 수 있다고 하셨는데, 특정 애니메이션 데이터를 찾기 위해 검색 기능을 활용할 때 가장 효율적인 키워드나 분류 기준은 무엇인가요?